Now, I'm not claiming to be a pure blog photography expert here. I mean, I'm not at all am I - some of the photos I take make me cringe long and hard for days. And be a bit sick in my mouth.
But on the flip side, I have been doing this whole blogging thing for coming up to three years now, I do speak to a lot of bloggers about their photography & the trends they've noticed and I did do photography as part of my degree - so I'm not totally useless. Or so I like to tell myself.
Here are a few tips I've bashed together - on the topic of blog photography, mastering flatlays and avoiding crap lighting; all things I wish I'd known when I first started out blogging and my photos were insanely sh*te.

1. Lighting is EVERYTHING
Getting the light right in your blog photos is crucial. You don't have to have the very latest camera, you don't need to remortgage your house to invest in PhotoShop and you don't need to redecorate your house from top to bottom with marble interiors. Once you've slayed the lighting beast, you'll be golden; regardless of the technology or location you're using. [Unless that technology is a camera phone from 2001 and you're snapping your OOTD in a Portaloo; in which case, you might need to re-evaluate your life choices. Just a bit.]
You might be worried that you'll need to invest in a pure studio and hire a camera crew to achieve the optimum lighting scenario - but this isn't the case at all, so don't stress boo. We're officially in Spring now - the days are longer, brighter and sunnier; and that's all you need to succeed. Bright, natural lighting, out of direct sunlight. No flash, no need to put on every light in the house. Just find a flat surface which isn't going to have shadows cast across it and has a bright, natural light source - & snap away. The flash of the camera or the warm glow of artificial lights [such as table lamps or normal light fixtures] add shadows, sh*te reflections and a weird orangey tinge to your photos; making them look gloomy AF. So avoid them, k, and draw your curtains to let the natural light in instead.
The only downfall with relying on natural light, is the hours it operates in. And sometimes, the fact that it seemingly doesn't even bother to show up for the day at all; like a flaky colleague at work. If you work a full time job like me; Monday - Friday 9 - 5:30pm, you might find you miss the best rays. Your blog photo opportunities might be few and far between, or maybe limited to weekends. If you're able to bulk take your shots in one master sesh, this might work for you. But if you're blogging a bit more regularly or end up having a tight deadline to meet, you might need to invest a few ££ into your setup, to make things easier.
I bought a set of 2 x Softboxes from eBay - which were about £20 for both; with all the bulbs and accessories included. There's loads on there yeno - some going cheaper than others and even some selling at auction format, where you can really snap up a bargain. If you're committed to the blog life, these lighting devices are useful to have & raise your photography game from sh*t to fit instantly. They're not an essential and sometimes I just use natural light anyway as they're a ballache to set up; but the one thing I love about having my own [sorta light] studio is that I can take my photos at any time of day or night. So I'm not restricted by the little tease that is the sun and when he decides to get / not get his hat on.
There's pros and cons to both methods of getting your lighting on - and probably loads of other ways you can achieve better lighting - but these are the two methods which I've tried and tested successfully. It's all about finding what works best for you.

2. Consistency & Theme
This kiiiiiiinda leads on from my point about lighting - but consistency in your photos is key. Especially in terms of lighting; blog photos just look so much more professional if they are presented in the same style consistently across your posts. I find it a bit of a turn off when photos look noticeably different to each other when I'm scrolling a post. Taking and selecting your blog photos is like creating an Insta theme in a way; know your aesthetic and stick to it. Photography is a visual art - so it needs to look good.
3. Don't stop till you get enough
Give yourself options - when you're taking blog photos, get a bit snap happy; like you're part of the blogger paparazzi. You might end up with 300 shots of the same flatlay on your camera roll, but what if you only take the one photo and assume it's okay, only to review it later and find that it's actually horsesh*t?
It's nice to have choice - and the focus, lighting and angles in your shots can end up slightly different in each image you take; so having a wide variety of shots can help you pick your strongest work and not just have to make do. What looks great in your mind might in reality, look turd once you get it off your memory card and onto a bigger screen. That old expectation vs reality moment.
It's nice to have choice - and the focus, lighting and angles in your shots can end up slightly different in each image you take; so having a wide variety of shots can help you pick your strongest work and not just have to make do. What looks great in your mind might in reality, look turd once you get it off your memory card and onto a bigger screen. That old expectation vs reality moment.

4. Blog props & backdrops
You don't have to spend a small fortune on these things, but they do make a difference. I can only dream of having access to lavish marble surfaces, bouquets of luxury fresh flowers and thick fur rugs to snuggle up in by the fire. But you can fake it till you make it gals, so here I am with a piece of marble print wrapping paper and a magazine from months ago that I keep reusing in my photos, haha.
Cheap bouquets of carnations from the petrol station, that's my thing. Dried petals from Paperchase, cheap lights & accessories from Primark, makeup brush sets for a quid on eBay, wallpaper samples and rolls wrapping paper. I even managed to pick up a faux fur throw thing from Ikea for a tenner at Christmas, which I was low key buzzing about. Once you've edited and cropped your image to perfection, noone will suspect a thing.
Once you have a small selection of props to pick from, you're sorted. I have a small cardboard box to store mine in, which I wap out when I'm in a snap happy kinda mood. My fave budget stores to grab props from are:
Wilkos
Asda
eBay
B&M Bargains
Home Bargains
Primark
New Look
H&M
Ikea
Etsy

5. Slaying the Flatlay
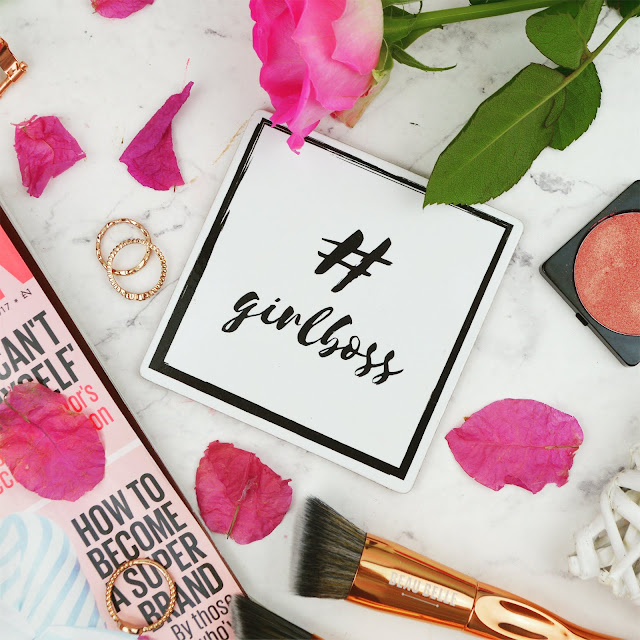
Flatlays can be difficult to master, but they're super effective when you manage it. I don't really have too many tips to share on this front, as I'm still working on improving myself. But angles, composition and lighting are all key.
I normally place my products in the places I want them to be and then build up the shot with accessories; tweaking & styling everything so that it works well together. Don't overwhelm the shot with too much and do make sure that the main focal point of the shot you're composing is the product you're capturing. And use relevant props - accessories you'd use with the product, props with colours that complement the focal point of the image, maybe even magazine pages with appropriate images / text on.
Make sure your lighting is on point and that you capture the shot from above; so that there aren't any shadows. I like to use props such as sequins, dried petals, fresh flowers, pot pourporri, beauty accessories, rings, candles, cacti and makeup; to add mood and context to my photos.

6. Editing
Sometimes, no matter how hard you try, your photos won't turn out exactly as planned. And that's okay - mine always look sh*te at first. And sometimes, even pretty sick looking images can benefit from a cheeky tweak.
To edit my images, I usually increase the brightness, boost the saturation a little and yeno, have a little play about the shadows / contrast. I could tell you in more detail how I edit my shots, but I'll save that for another post, as you might not actually want to know and think that I'm chatting pure sh*t, haha.

7 Camera
This isn't actually a tip, it's just a statement. In the blogisphere, you'd easily be mistaken that you have to have a pure flashy camera and all the latest tech to be taken seriously or get anywhere. But when you don't have much money like me, you can sometimes feel daunted, overwhelmed and inferior - as this just isn't an option.
I just want to say that gals, you don't need to feel this way, okay?
You can take shots every bit as good as the next person, using just your phone, you know. Once you get your lighting right, the quality of your photos will automatically improve leaps and bounds. I take quite a lot of my blog photos on my iPhone [it's not a new one or anything fancy] and you wouldn't know the difference. Though I am lucky enough to own a pretty alright camera, but this is through having studied photography at Uni and having pursued it since I graduated, but before blogging. It's a few years old though, definitely not the latest model.
8. Happy Snapping!
One of the most important tips I could give anyone - blogger or non-blogger, amateur or pro - would be that the ultimate tip to great photography is to simply enjoy taking it.
Enjoy putting your images together, appreciating the beauty in your subject matter, discovering new angles to shoot from and new appreciation for the items in front of you. You can always tell a rushed job miles apart from an image captured with thought, love and enjoyment - so let your passion shine through and the rest will fall into place naturally.

Did you find any of these tips helpful? Do you have any advice you'd like to share to help others, or perhaps links to posts you've written on this topic yourself?


Add your comment